Powered by Blogger.

Dinghy Plans for Classic Wooden Boat Construction

Dinghy Plans for Classic Wooden Boat Construction

Classic Wooden Dinghy Plans: A Guide to Building Your Own

The allure of a classic wooden dinghy lies in its timeless elegance and the satisfaction of building a beautiful, functional boat from scratch. With detailed plans and a passion for craftsmanship, you can bring a piece of nautical history to life in your own backyard. This article delves into the process of selecting and interpreting classic wooden dinghy plans, providing a comprehensive guide to embark on your boatbuilding journey.

Choosing the Right Plans

The first step is to find plans that suit your skill level, available resources, and desired boat size. Consider the following factors:

Type of Dinghy

  • Rowing Dinghy: These are designed for rowing and typically have a shallow draft for navigating shallow waters.
  • Sailing Dinghy: These are equipped with a sail and mast for wind-powered propulsion.
  • Motor Dinghy: These are designed for use with a small outboard motor.

Size and Capacity

The size and capacity of the dinghy will determine its suitability for various purposes, such as personal use, family outings, or racing.

Construction Method

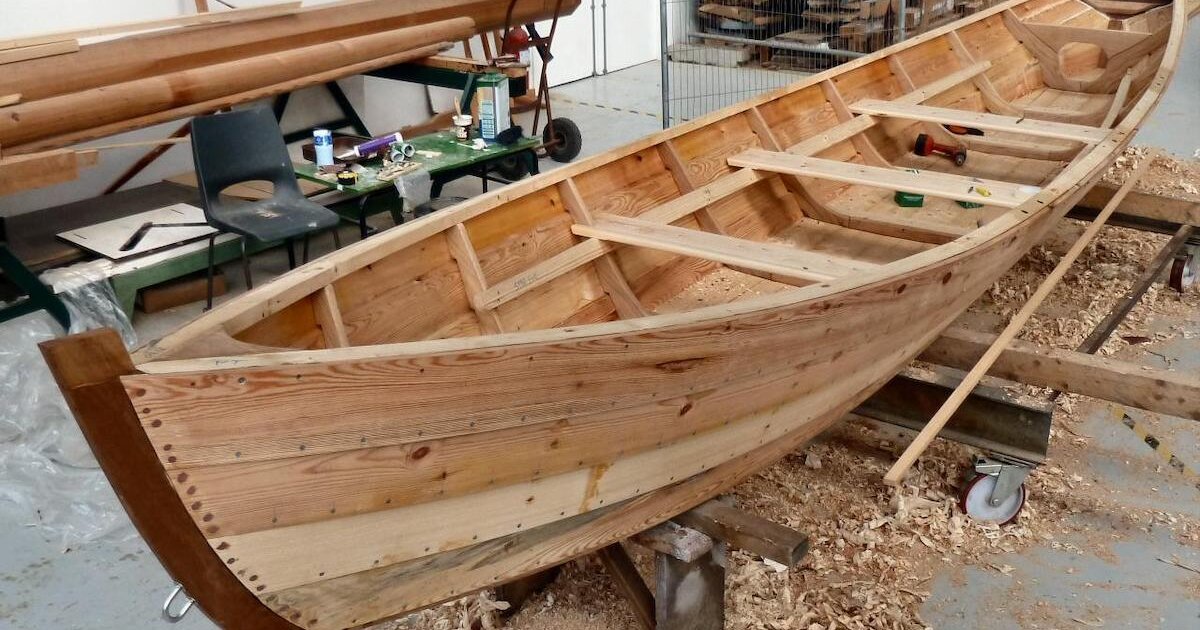
Classic wooden dinghy plans often specify different construction methods, such as stitch-and-glue, carvel planking, or clinker planking. Each method has its unique advantages and challenges.

Availability of Materials

Ensure that the materials required for the construction, including wood, fasteners, and epoxy, are readily available in your area.

Plan Format

Plans are available in various formats, such as PDF, printed paper, or even blueprints. Choose the format that best suits your preference and capabilities.

Understanding the Plans

Once you have selected your plans, take the time to thoroughly study them. The plans typically include the following sections:

Lines Plans

These diagrams depict the boat's shape and dimensions in profile, plan, and elevation views. They are essential for cutting and shaping the hull components.

Construction Drawings

These detailed drawings illustrate the assembly process, showing the arrangement of frames, planks, and other structural elements. They also specify dimensions and joinery details.

Materials List

The materials list provides a comprehensive inventory of wood types, fasteners, and other materials needed for construction.

Building Instructions

The instructions guide you through each step of the building process, from laying the keel to finishing the hull. They often include tips and techniques for specific operations.

Essential Tools and Equipment

To build your wooden dinghy, you will need a variety of tools and equipment. Some essential items include:

  • Hand Tools: Saw, plane, chisel, mallet, clamps, sandpaper, etc.
  • Power Tools: Drill, jigsaw, sander, router, etc.
  • Measuring and Marking Tools: Tape measure, ruler, protractor, pencil, etc.
  • Workbenches and Jigs: To support and secure the boat during construction.
  • Epoxy and Resin: For bonding and sealing the wooden components.
  • Safety Equipment: Eye protection, gloves, dust mask, etc.

The Building Process

Building a classic wooden dinghy is a multi-step process that requires patience and attention to detail. Here is a general outline:

Step 1: Preparing the Materials

Begin by thoroughly preparing the wood according to the plans. This includes milling, planing, and shaping the wood to the specified dimensions.

Step 2: Constructing the Frames

The frames provide the boat's structure and support. Use the plans as a guide to cut and assemble the frames. Make sure they are accurately shaped and spaced.

Step 3: Laying the Keel

The keel is the backbone of the boat. It is laid down first and serves as a foundation for the frames and planking.

Step 4: Planking the Hull

The hull is constructed by attaching planks to the frames. The method of planking (carvel, clinker, etc.) is determined by the plans. Carefully shape and fasten each plank to create a smooth and watertight hull.

Step 5: Finishing the Hull

Once the planking is complete, sand the hull smooth, apply epoxy or resin, and paint or varnish it to provide a durable and attractive finish.

Step 6: Installing the Deck

Construct and install the deck according to the plans. This may involve adding deck beams, planking, and other components.

Step 7: Adding the Fittings

Install any necessary fittings, such as oarlocks, cleats, and hatches. This will be determined by the type of dinghy you are building.

Step 8: Launching and Enjoying Your Boat

Once the construction is complete, carefully launch your boat and test it in the water. Enjoy the fruits of your labor and the satisfaction of building a beautiful, functional, and historically inspired vessel.

Tips for Success

  • Read the plans carefully: Study the plans thoroughly before beginning construction to ensure you understand every step.
  • Use quality materials: Invest in high-quality wood and other materials to ensure durability and longevity.
  • Take your time: Boatbuilding is a time-consuming process. Don't rush it and allow yourself plenty of time to complete each step carefully.
  • Seek guidance: If you are unsure about any aspect of the building process, consult with experienced boatbuilders or join a boatbuilding forum.
  • Enjoy the process: Boatbuilding is a rewarding and challenging endeavor. Embrace the learning experience and savor the satisfaction of creating something beautiful and functional.

By following these tips and using reliable plans, you can embark on a fulfilling and rewarding journey to build a classic wooden dinghy that will bring you joy and pride for years to come.

Essential Tools and Materials for Building a Wooden Kayak

Essential Tools and Materials for Building a Wooden Kayak

Essential Tools and Materials for Building a Wooden Kayak: A Beginner's Guide

Building a wooden kayak is a rewarding project that combines woodworking skills with the satisfaction of creating something beautiful and functional. It's a journey that takes you from the initial design phase through the intricate process of shaping and finishing your own boat. While it might seem daunting, it's a project that can be tackled by anyone with dedication and the right tools. This guide will walk you through the essential tools and materials needed to embark on this exciting adventure.

Tools of the Trade: Essential Equipment for Your Kayak Build

Before you dive into the world of wooden kayak construction, you'll need to gather the right tools. Having the right equipment makes the process smoother and safer, allowing you to focus on creating a beautiful and functional kayak. Here's a rundown of the essentials:

Power Tools:

  • Table Saw: This is crucial for cutting plywood and wood strips to size. Make sure it has a good fence system for precise cuts.
  • Band Saw: A band saw is your best friend for shaping complex curves and making intricate cuts.
  • Jig Saw: A jig saw is handy for cutting out shapes and working in tight spaces.
  • Drill/Driver: A good drill with a range of drill bits and driver bits is essential for drilling holes and securing fasteners.
  • Random Orbit Sander: This sander is fantastic for smoothing surfaces and removing imperfections.
  • Belt Sander: A belt sander is powerful for quick sanding, especially on larger surfaces. Use it with caution to avoid creating dips or hollows in the wood.

Hand Tools:

  • Hand Plane: This classic tool is crucial for smoothing and shaping the wood. Invest in a good quality block plane for finer work.
  • Chisels: You'll need a range of chisels, from small gouges to wider blades, for shaping and carving the wood.
  • Hammers: A claw hammer for driving nails and a rubber mallet for gentle work are both essential.
  • Clamps: You'll need a variety of clamps for holding wood securely during assembly and shaping.
  • Measuring Tools: Invest in a good tape measure, rulers, and a compass for precise measurements.
  • Sandpaper: A range of sandpaper grits from coarse to fine is essential for achieving a smooth finish.
  • Woodworking Mallet: A mallet is perfect for hammering on wooden surfaces without damaging the wood. It's often used for assembling parts and driving in wooden pegs.
  • Scissors: While not strictly a woodworking tool, scissors are essential for cutting fiberglass and other materials used in the building process.

Essential Materials: Building Blocks for Your Kayak

Now that you have the tools, let's talk about the materials that will make up your kayak:

Wood:

  • Marine Plywood: This is the foundation of your kayak. Choose a high-quality marine plywood with a waterproof core. Common choices include Okoume, Baltic Birch, and Western Cedar.
  • Cedar Strips: Cedar strips are often used to add strength and a beautiful aesthetic to the kayak. They're lightweight and easy to work with.
  • Pine or Spruce: These woods can be used for the keel and ribs, offering both strength and flexibility.

Structural and Finishing Materials:

  • Epoxy Resin and Hardener: Epoxy is the glue that holds your kayak together. It's strong, waterproof, and durable. Be sure to use a marine-grade epoxy specifically designed for boat building.
  • Fiberglass Cloth: Fiberglass cloth is used to reinforce the hull, adding strength and watertightness.
  • Polyester Resin and Hardener: Polyester resin is a more economical option for fiberglassing, but it's less strong and durable than epoxy.
  • Wood Filler: Wood filler helps to fill gaps and imperfections in the wood.
  • Marine Spar Varnish: A marine-grade spar varnish provides a durable and weatherproof finish for your kayak. It's essential for protecting the wood from the elements.
  • Paint: If you prefer a painted finish, choose a marine-grade paint designed for boats.

Extra Tips and Considerations:

Building a wooden kayak is a labor of love that requires patience and attention to detail. Here are a few tips to make the process smoother:

  • Start with a well-designed plan: Choose a kayak design that suits your skill level and desired performance.
  • Invest in quality tools: Don't skimp on tools. Good tools make the process easier and result in a better finished product.
  • Take your time: Building a kayak is a journey. Don't rush the process. Enjoy the process of creating something special.
  • Practice your skills: Practice your woodworking skills on scrap wood before working on your kayak.
  • Seek guidance and advice: Don't be afraid to ask for help or advice from experienced kayak builders.
  • Safety First: Always wear eye protection and a dust mask when working with wood and other materials.

Commonly Asked Questions:

Here are answers to some questions you might have about building a wooden kayak:

Q: How much does it cost to build a wooden kayak?

The cost of building a wooden kayak varies depending on the size, design, and materials you choose. It's generally cheaper to build a wooden kayak than to buy one, but it can still be a significant investment. Expect to spend anywhere from $500 to $2,000 or more.

Q: How long does it take to build a wooden kayak?

The time it takes to build a kayak depends on your experience, the complexity of the design, and how much time you can dedicate to the project. It can take anywhere from a few weeks to several months.

Q: Do I need any woodworking experience to build a wooden kayak?

It's helpful to have some woodworking experience, but it's not essential. Many beginners have successfully built wooden kayaks. There are plenty of resources and online communities that offer guidance and support.

Q: Is building a wooden kayak worth it?

The decision of whether or not to build a wooden kayak is a personal one. If you enjoy woodworking, want a unique and beautiful kayak, and are willing to invest the time and effort, then building a wooden kayak is a rewarding experience.

Building a wooden kayak is a journey of discovery, creativity, and personal accomplishment. It's a chance to connect with the ancient art of boat building and create a vessel that will last for years to come. With the right tools, materials, and a bit of patience, you can bring your dream of owning a wooden kayak to life.

Best DIY Wooden Boat Plans for First-Time Builders

Best DIY Wooden Boat Plans for First-Time Builders

Best DIY Wooden Boat Plans for First-Time Builders: Where to Start Your Aquatic Adventure

Hey there, fellow boat enthusiast! Are you dreaming of gliding across the water in a vessel you built with your own two hands? You're not alone! Building a wooden boat is a rewarding and deeply satisfying project, and with the right plans, it can be achievable even for beginners.

Now, I know what you're thinking: "Wooden boat building? That sounds like a massive undertaking!" And you're not wrong, it's a commitment. But it doesn't have to be overwhelming. There are plenty of fantastic DIY plans available, specifically designed for first-time builders.

Let's dive in and explore some of the best wooden boat plans for beginners, along with tips to make your journey smoother.

Essential Factors to Consider Before Choosing Plans

Before you get swept away by all the gorgeous boat designs, take a moment to think about these key aspects:

  • Skill Level: Be honest with yourself about your woodworking skills. A simple dinghy might be a better starting point than a complex sailboat.
  • Time Commitment: Boat building takes time, often more than you initially estimate. Factor in your available time before committing.
  • Budget: Materials, tools, and potential unforeseen expenses can add up. Create a budget and stick to it.
  • Boat Type: Do you dream of a sleek rowboat, a sturdy canoe, or a nimble kayak? Consider your intended use and choose a design that aligns with your needs.
  • Space: You'll need a workspace, and it should be spacious enough for your boat project. Consider both indoor and outdoor options.

Top Wooden Boat Plans for First-Time Builders

Ready to get started? Here are some highly-recommended plans for beginners, covering various boat types:

Classic Rowboats

  • The "Peapod": This iconic boat is a simple and beginner-friendly design. It's a sturdy, reliable rowboat perfect for leisurely paddling on calm waters.
  • The "Dory": Another classic, the Dory is known for its seaworthiness and stability. It's a great option for those who want to venture out onto open waters.

Versatile Canoes

  • The "Solo Canoe": As the name suggests, this single-person canoe is a great entry point. It's manageable in size and requires less material, making it an ideal first project.
  • The "Tandem Canoe": For those wanting a two-person canoe, there are well-documented plans for a classic tandem design. Just remember that the size and complexity increase, so be prepared for a longer build.

Compact Kayaks

  • The "Stitch and Glue Kayak": This method involves joining the hull pieces together with glue and stitching. It's a relatively easy and forgiving process, especially for beginners.
  • The "Strip-Built Kayak": This technique uses thin strips of wood glued together to create the hull. It's a bit more involved, but it allows for a more refined and durable finished product.

Simple Sailboats

  • The "Mirror Dinghy": This iconic sailboat is a popular choice for beginner builders. It's small, manageable, and a joy to sail.
  • The "Optimist": Another fantastic option for young sailors, the Optimist is a stable and easy-to-handle sailboat that's perfect for learning the ropes.

Tips for Success: Making Your Boat Building Journey Smoother

Here are some extra tips to help you conquer your boat building project:

  • Start Small: Don't jump into a massive project right away. A smaller, simpler boat is a great way to gain experience and build confidence.
  • Read Carefully: The boat plans will be your roadmap. Read them thoroughly, understand the instructions, and don't hesitate to ask questions if anything is unclear.
  • Invest in Quality Tools: Good tools will make your work easier and more accurate. Don't skimp on essentials like a good saw, a drill, and clamps.
  • Don't Rush: Boat building takes time. Take your time, pay attention to detail, and celebrate each milestone along the way.
  • Seek Guidance: There are many resources available for boat builders, including online forums, local woodworking clubs, and experienced boat builders who are happy to share their knowledge.

Commonly Asked Questions

Here are some common questions about building wooden boats that often pop up for first-timers:

Where can I find wooden boat plans?

There are many resources available:

  • Online Retailers: Websites like Glen-L, Boat Plans USA, and Duckworks offer a wide variety of plans.
  • Boat Building Books: Check out your local library or bookstore for books dedicated to boat building plans.
  • Boat Building Clubs: Many clubs offer access to plans and expert guidance.

How much will it cost to build a wooden boat?

The cost can vary greatly depending on the size and complexity of the boat, the type of wood you choose, and the tools you need. You can expect to spend anywhere from a few hundred dollars for a small dinghy to several thousand dollars for a larger sailboat.

What kind of wood is best for boat building?

Common boat building woods include cedar, mahogany, oak, and pine. Each has its own advantages and disadvantages in terms of strength, durability, and cost. The plans you choose will often recommend specific woods.

Do I need to be a skilled woodworker to build a boat?

While some woodworking skills are helpful, you don't need to be an expert to start. Many plans are designed with beginners in mind and provide detailed instructions. The most important thing is to have patience, follow the instructions carefully, and learn as you go.

What if I run into problems?

Don't worry, everyone encounters challenges. There are plenty of resources available for help. You can consult the plans, seek advice from experienced boat builders, or join online forums where you can connect with others who have encountered similar issues.

Remember, the journey is part of the fun! Building your own wooden boat is a rewarding challenge, filled with learning and a sense of accomplishment. So, grab those plans, gather your tools, and embark on your aquatic adventure!

Building a Wooden Powerboat: Easy-to-Follow Step-by-Step Guide

Building a Wooden Powerboat: Easy-to-Follow Step-by-Step Guide

Building a Wooden Powerboat: A Comprehensive Guide

Constructing a wooden powerboat is a challenging yet rewarding endeavor. This comprehensive guide will provide you with a detailed step-by-step process, encompassing everything from design considerations to finishing touches. Whether you are a seasoned boatbuilder or a passionate novice, this guide will equip you with the knowledge and skills to bring your dream boat to life.

1. Planning and Design

1.1 Determine Your Needs and Goals

Before embarking on the construction journey, define your boat's purpose, desired size, and performance characteristics. Consider factors such as:

  • Intended Use: Fishing, cruising, watersports, or a combination thereof.
  • Boat Length and Beam: Optimize for stability, speed, and maneuverability.
  • Draft: Determine the minimum water depth for operation.
  • Engine Power: Select an appropriate engine size for your desired speed and load capacity.

1.2 Choosing a Design

You have two primary options:

  • Custom Design: Hire a naval architect to create a unique design tailored to your specifications. This allows for maximum flexibility and control over the boat's features.
  • Pre-Existing Plans: Opt for readily available plans from reputable sources, offering a wide variety of styles and sizes. These plans often include detailed instructions and materials lists, simplifying the construction process.

1.3 Materials Selection

Select high-quality, marine-grade materials that can withstand the rigors of water exposure and environmental conditions.

  • Hull Lumber: Choose strong and rot-resistant woods such as cedar, mahogany, or teak. Consider using marine plywood for structural panels.
  • Deck Lumber: Select durable, weather-resistant woods like teak or ipe for decking and trim.
  • Fasteners: Use marine-grade stainless steel screws, bolts, and rivets for secure and lasting connections.
  • Epoxy Resin: Select a high-quality epoxy resin for bonding wood components, sealing seams, and providing a waterproof barrier.

2. Construction Process

2.1 Preparing the Work Area

Establish a dedicated workspace with ample space for constructing the boat. Ensure the area is well-ventilated, free from debris, and has a level surface. Consider using a boatbuilding jig or cradle to support the hull during construction.

2.2 Building the Frames

Start by constructing the boat's frames, which provide the skeletal structure of the hull. Follow the design plans meticulously, using precision cuts and measurements.

  • Frame Material: Use strong and flexible woods like oak, ash, or spruce for the frames.
  • Frame Assembly: Join the frame members using mortise and tenon joints or scarf joints, ensuring a tight and robust connection.

2.3 Planking the Hull

Attach the planking to the frames, creating the hull's outer shell. Use marine plywood or wooden planks, carefully fitting and attaching them to the frames.

  • Planking Material: Use marine plywood or wooden planks of appropriate thickness for the hull.
  • Planking Attachment: Secure the planks using epoxy, screws, or rivets. Ensure a watertight seal between each plank.
  • Fairing the Hull: Once the planking is complete, fair the hull using wood filler or epoxy to create a smooth, flowing surface.

2.4 Deck and Superstructure Construction

Build the deck and any other superstructure elements according to the design plans. Use durable, weather-resistant woods and follow the same principles of precision and craftsmanship used for the hull.

2.5 Installing the Engine and Transom

Install the engine and transom, ensuring proper alignment and support. Ensure the engine mounts are strong enough to handle the engine's weight and vibrations.

3. Finishing and Launching

3.1 Applying Finishing Touches

Apply finishing touches to the boat, including sanding, priming, painting, and varnishing. Ensure all surfaces are properly prepared and protected from water damage.

3.2 Installing Equipment and Systems

Install necessary equipment such as navigation lights, steering system, fuel tank, and other essential systems. Ensure proper placement and functionality of all equipment.

3.3 Launching the Boat

Once the boat is complete, launch it into the water for the first time. Inspect for any leaks or issues and make necessary adjustments before embarking on your inaugural voyage.

4. Safety and Maintenance

Safety and proper maintenance are crucial for ensuring the longevity and reliability of your wooden powerboat.

  • Safety Equipment: Equip your boat with essential safety gear such as life jackets, fire extinguishers, and flares.
  • Regular Maintenance: Perform regular inspections and maintenance to prevent any issues from developing. Inspect for leaks, rot, and wear and tear.
  • Storage: Store the boat in a dry, well-ventilated area to protect it from moisture and damage.

5. Conclusion

Building a wooden powerboat is an exciting and fulfilling journey. By following the steps outlined in this guide, you can create a beautiful and functional boat that will provide years of enjoyment on the water. Remember to prioritize safety, craftsmanship, and proper maintenance to ensure a successful and rewarding experience.

How to Build a Dinghy Hull: Complete Step-by-Step Plans

How to Build a Dinghy Hull: Complete Step-by-Step Plans

Building a Dinghy Hull: A Comprehensive Guide

Constructing a dinghy hull can be an enriching and rewarding experience for any aspiring boat builder. This detailed guide provides a step-by-step approach to crafting a sturdy and functional hull from scratch, ensuring a successful project for both seasoned and novice builders.

Step 1: Design and Planning

Before embarking on construction, meticulous planning is paramount. This includes defining the dinghy's intended purpose, size, and design elements.

1.1 Determine the Dinghy's Purpose

Consider how you intend to use the dinghy. Will it primarily be used for:

  • Sailing
  • Rowing
  • Motoring
  • General leisure activities
This will influence factors like hull shape, size, and stability.

1.2 Choose a Suitable Design

Numerous dinghy designs exist, ranging from classic dinghies to modern, high-performance models. Factors to consider when choosing a design include:

  • Hull shape: Choose a design that suits the intended purpose. A flat-bottomed hull is suitable for rowing or sailing in calm waters, while a V-shaped hull provides better handling in choppy conditions.
  • Length and width: Larger dinghies are more stable and accommodate more passengers, while smaller dinghies are easier to transport and maneuver.
  • Material: Choose a material that is durable, affordable, and suits your construction skills. Common materials include plywood, fiberglass, and aluminum.

1.3 Prepare the Plans

Detailed plans are essential for a successful build. These can be purchased from reputable boat design companies or found online. The plans should include:

  • Full-size hull patterns: These are templates used to cut the hull panels.
  • Construction drawings: These provide detailed instructions on how to assemble the hull.
  • Material specifications: These outline the types and quantities of materials required.

Step 2: Gathering Materials and Tools

Once the design is finalized, gather all necessary materials and tools. This ensures a smooth construction process.

2.1 Materials

The materials required will depend on the chosen design and materials specified in the plans. Common materials include:

  • Plywood: Marine-grade plywood is ideal due to its water resistance and strength.
  • Fiberglass cloth: Provides a strong and watertight outer shell.
  • Epoxy resin: Acts as a bonding agent for the fiberglass cloth and plywood.
  • Wood filler: Used to fill gaps and imperfections in the hull.
  • Paint: Provides a protective coating for the hull.
  • Hardware: Includes fasteners, cleats, and other fittings.

2.2 Tools

Essential tools for building a dinghy hull include:

  • Circular saw: Used to cut plywood panels.
  • Jig saw: Used for intricate cuts and curves.
  • Sanding tools: Used to smooth surfaces and prepare for fiberglass.
  • Brushes and rollers: For applying epoxy resin and paint.
  • Clamps: Used to hold pieces in place during assembly.
  • Measuring tools: Rulers, tape measures, and squares.

Step 3: Constructing the Hull

The construction process involves assembling the hull panels and reinforcing them with fiberglass. This step requires careful attention to detail and accuracy.

3.1 Cutting the Hull Panels

Using the full-size hull patterns, cut the plywood panels to the desired shapes. Ensure all cuts are accurate and precise. Use a circular saw or jig saw, depending on the complexity of the cuts.

3.2 Assembling the Hull

Refer to the construction drawings to assemble the hull panels. Carefully align and secure the panels using screws, bolts, or epoxy resin. Use clamps to hold the panels firmly in place while the bonding agent cures.

3.3 Reinforcing the Hull

Once the hull is assembled, reinforce it with fiberglass cloth and epoxy resin. This process involves:

  • Applying epoxy resin: Brush or roll the epoxy resin onto the hull's interior and exterior surfaces.
  • Laying fiberglass cloth: Place the fiberglass cloth on the resin-coated surfaces, ensuring it's fully wetted and free of air bubbles.
  • Applying additional layers of resin: Add multiple layers of resin and fiberglass cloth to create a strong and watertight shell.

Step 4: Finishing Touches

After the hull is reinforced, it's time to add finishing touches for a functional and aesthetically pleasing dinghy.

4.1 Sanding and Filling

Sand the hull smooth to remove any imperfections or rough edges. Use various grits of sandpaper to achieve the desired finish. Fill any gaps or imperfections with wood filler.

4.2 Painting

Apply paint to the hull to provide protection and enhance its appearance. Choose a marine-grade paint suitable for underwater and above-water applications.

4.3 Installing Hardware

Install any necessary hardware, including cleats, oarlocks, and deck fittings. Ensure these are securely attached and properly positioned.

Step 5: Launching and Enjoying

After completing the construction, launch your new dinghy and enjoy its functionality. Remember to:

  • Inspect the hull: Ensure there are no leaks or any other issues before launching.
  • Use caution: Always wear a life jacket and adhere to safe boating practices.
  • Maintain the dinghy: Regularly inspect and maintain the hull to ensure its longevity and safety.

Building a dinghy hull is a challenging yet rewarding endeavor. With careful planning, meticulous execution, and attention to detail, you can create a durable and functional dinghy that will provide years of enjoyment on the water.

How to Build a Dinghy: Full Construction Plans for DIYers

How to Build a Dinghy: Full Construction Plans for DIYers

Building Your Own Dinghy: A DIYer's Guide to Nautical Glory

Hey there, fellow water enthusiast! Ever dreamt of gliding across the water in a boat you built with your own two hands? Well, dream no more! Building your own dinghy is a rewarding project that can lead to countless hours of fun on the water. This guide will take you through the entire process, from choosing the right design to launching your masterpiece.

Choosing Your Dinghy Design

Before you jump into the woodworking, you need to decide what kind of dinghy you want to build. There are countless designs out there, each with its own strengths and weaknesses.

Traditional Designs

These classics are often simple to build, using traditional boatbuilding techniques. They tend to be good all-around dinghies, suitable for a variety of uses. Examples include:

  • The Whitehall: Known for its sleek, elegant lines and good stability.
  • The Dory: A sturdy, shallow-draft design perfect for fishing and exploring rocky shorelines.
  • The Punt: A flat-bottomed, rectangular boat designed for shallow water and leisurely paddling.

Modern Designs

Modern dinghies often incorporate innovative materials and construction methods. They can be lighter, faster, and more maneuverable than traditional designs.

  • The Skiff: A lightweight, high-performance design ideal for sailing or rowing.
  • The Inflatable: A popular choice for portability and ease of storage. These boats can be easily deflated and packed away.
  • The Kayak: Another option for personal watercraft, kayaks offer a more intimate and engaging paddling experience.

Gathering Your Materials

Once you've chosen your design, it's time to gather your materials. The specific materials will depend on your design and personal preferences. Here's a general list:

  • Wood: This is often the primary material for dinghy construction. Common choices include marine plywood, cedar, oak, and mahogany.
  • Epoxy Resin and Hardener: Used to bond wood and fiberglass, creating a strong and watertight hull.
  • Fiberglass Cloth: Reinforces the wood structure, adding strength and durability.
  • Hardware: This includes items like screws, bolts, cleats, oarlocks, and other fittings.
  • Paint: Used to protect the wood and add a personal touch.

Building Your Dinghy

Now comes the fun part - building your boat! The process involves a series of steps that require patience, attention to detail, and a good understanding of woodworking. Here's a general overview:

Step 1: Building the Frames

Start by building the frames that form the shape of the boat. This involves cutting and shaping wood according to your design plans. These frames are typically made of strong hardwood and are carefully joined together to form a rigid structure.

Step 2: Planking the Hull

Once the frames are in place, you'll begin planking the hull. This involves attaching thin sheets of wood, known as planks, to the frames. The planks are carefully fitted and glued together to create a smooth and watertight surface.

Step 3: Adding the Deck and Interior

After the hull is complete, you'll add the deck and any interior features, like seating and storage compartments. The deck provides additional strength and weather protection, while the interior features enhance the boat's functionality.

Step 4: Applying Epoxy and Fiberglass

Once the basic structure is in place, it's time to add strength and water resistance. This is done by applying layers of epoxy resin and fiberglass cloth. The epoxy bonds with the wood and the fiberglass adds additional strength and durability.

Step 5: Sanding, Painting, and Finishing

After the epoxy and fiberglass have cured, you'll need to sand the hull to create a smooth surface. Once sanded, you can paint the boat in your desired color and finish. This step protects the wood and gives your dinghy a beautiful aesthetic.

Launching Your Masterpiece

After all your hard work, the moment has finally arrived! Launching your homemade dinghy is an incredibly satisfying experience. Here are some tips for a successful launch:

  • Check the water conditions: Make sure the water is calm and there are no strong currents or winds.
  • Choose a suitable launching spot: Look for a ramp or beach with easy access to the water.
  • Have help on hand: It's always a good idea to have someone assist you with the launch. They can help you guide the boat into the water and prevent any mishaps.
  • Take it slow and steady: Once in the water, take your time and get used to the feel of your new dinghy before venturing out too far.

Congratulations! You've now joined the ranks of proud boat builders. Enjoy all the adventures your new dinghy has to offer!

Build a fiberglass jon boat Cheapest

Any Build a fiberglass jon boat can certainly discovered right here For that reason you desire Build a fiberglass jon boat may be very famous in addition to most of us imagine a number of a few months into the future The examples below is actually a minimal excerpt a vital subject matter associated with Build a fiberglass jon boat we hope you understand what i mean as well as here are a few photos through numerous resources

Visuals Build a fiberglass jon boat


Aluminum boat repair is much easier than boats made with

Aluminum boat repair is much easier than boats made with

Build Your Own PVC Johnboat for Minimal Cost and Time.: 8

Build Your Own PVC Johnboat for Minimal Cost and Time.: 8

Guide Fiberglass duck boat plans ~ DES

Guide Fiberglass duck boat plans ~ DES

Jon Boat Duck Blind Plans Portable hunting blinds and

Jon Boat Duck Blind Plans Portable hunting blinds and